Baby Portraits: Get Great Shots With These Baby Photography Tips
- Get link
- X
- Other Apps
Shooting baby portraits using window light, and with bokeh as soft as the subject
Most parents want beautiful shots of their babies, and one way to get that is to use a shallow depth of field to add plenty of background blur, emphasizing the softness and fragility of the subject.
A prime lens with a wide maximum aperture like a 50mm f/1.4 comes in handy here. The wide aperture means that we can shoot with a narrow depth of field, picking out details while blurring everything else. Wide apertures also enable us to work in lower light, so they're perfect for window-lit portraits where the light can be fairly low.
Younger babies, like two-month-old Alice here, won’t be crawling or sitting up on their own, which means you can focus precisely and take a little time over framing the shot. On the other hand, it also means that you’re restricted in the types of poses you can try.
There are really only three options: lie them on their backs, try them on their tummies, or ask the parents to hold them. The limitations of the shoot can be a blessing, forcing you to focus your attention on perfecting the shots while working with what’s available.

Get great baby portraits with beautiful soft depth of field
(Image credit: James Paterson)
It helps if you come prepared. Bring a few blankets and cushions to the shoot – furry rugs can be handy, as they add texture to the shots and babies like the feel of them on their skin.
To the outside observer one baby looks very much like another (but don’t say that to the parents!), so look for ways to add personality to the shots. A favorite toy or blanket can work well. Ask the parents for a few changes of clothes, too. Hats are particularly effective, as they frame the face and provide a splash of color.
A reflector proves invaluable when shooting with window light, which illuminates one side of the subject more than the other. Positioned opposite the window, the reflector bounces some of the light back at the subject, lifting the shadows. The effects are often quite subtle, but vital for professional results.
You never know what you’re going to get when photographing babies. They could be happy, grumpy, sleepy, hungry or a mixture of these things. You need to be ready to adapt your approach. One thing is certain: you’ll need to work quickly!
Baby portraits: step by step
Windows work like softboxes in many ways: the closer your subject is to the light source, the stronger the light is. Unless you’ve got sunlight falling through the window directly onto the baby (which will probably cause a lot of grizzling and eye-scrunching), it should be fairly soft. To increase or decrease the light, you’ll need to move the baby closer to the window or further away.
01 Soft options
(Image credit: James Paterson)
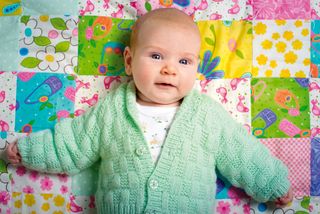
Bring light and dark blankets to the shoot. They give you different background options and babies like soft textures or fur against their skin. Use quilts, clothes, and toys that are personal to the baby as props. They’ll help to add color to your portraits and, for a shallow-depth-of-field shot, any patterns will blur beautifully.
02 Position the baby

(Image credit: James Paterson)
In a photograph, you can tell where the window is from the catchlights in the eyes. Make sure that the light is coming from above the face, rather than below – picking out the top of the head, cheeks, and tip of the nose, not under the chin and nose. This is a more natural angle for light, as our eyes are used to seeing light coming from above.
03 Select aperture-priority
(Image credit: James Paterson)
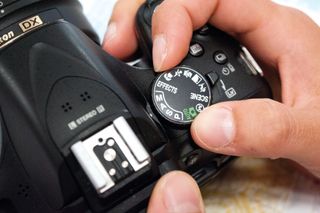
Set your camera to aperture priority mode. This way, you can choose the aperture while the camera works out the correct shutter speed for a good exposure. This means that you have full control over the depth of field in the shot, and can narrow the aperture slightly if you decide you’re getting a little too much blur.
04 Choose a wide aperture
(Image credit: James Paterson)
Set your lens’ maximum aperture – this allows for low light and enables you to create a very shallow depth of field. This is where prime lenses with wide maximum apertures like f/1.4 or f/1.8 come into their own, as the wider the aperture you’re able to use, the shallower the depth of field in your pictures will be.
05 Set a high ISO
(Image credit: James Paterson)
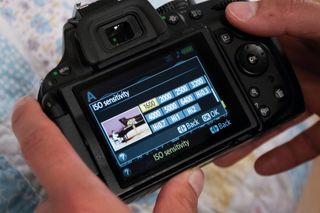
As the baby can’t pose on request, you’ll be shooting handheld for flexibility, so set an ISO high enough to allow for a fast shutter speed of at least 1/100 second. With window light and a wide aperture, ISO400 should be enough, but you might need to go up to ISO800 or 1600 (or alternatively set Auto ISO).
06 Focus precisely
As is usually the case in portraits, the eyes are the most important point. Though for some of the shots, you could get creative and focus on the tips of tiny fingers instead – perhaps with the parent’s fingers to give a sense of scale, allowing the rest of the baby to fade into a gentle blur. Work quickly, though, as babies don’t stay still for long!
07) Time to reflect
A fold-out reflector is really useful for bouncing window light back on to your subject. Most come with matte and silvered surfaces to change the character of the light, and the best reflectors for photography come in all shapes and sizes.
However, if you’re not going to use a reflector regularly, you don’t need to rush out to buy one for this project. A piece of white card will bounce light back towards the baby, removing hard shadows and reducing contrast, or for a more reflective effect, you can cover the card with foil.
Presenting your portraits
Baby photos are going to be put on display by proud parents – possibly for decades. Think hard about how they’ll look on the show. Unusual shape or other presentation methods can really make your portraits sing.
(Image credit: James Paterson)
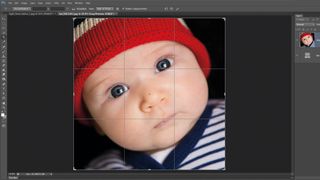
Crop to squareA square crop helps to give your portraits a timeless quality and allows you to come in really tight to the baby’s face.
(Image credit: James Paterson)
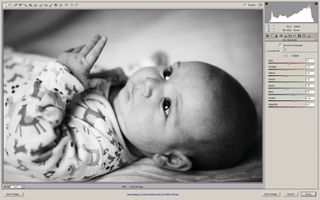
Convert to monoUse the HSL Panel in Camera Raw, or Lightroom’s Black and White presets for a punchy monochrome conversion.
(Image credit: James Paterson)
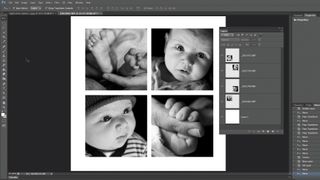
Compile a gridDetail shots and close-ups can look beautiful when presented as a grid of images. Crop all the images the same and arrange them in Photoshop to visualize how they’ll look when grouped.
Must Check Out Posts:
Erase unwanted objects and perfect your amazing photos!
Remove objects from photos with Photo Eraser is almost as easy as taking a shot. Now you can use this tool to erase undesirable objects from your pictures, such as tourists, watermarks, logos, texts, blemishes and other unwanted things without real photo-editing skills required at all.
The most powerful and professional data recovery software for Android that can restore deleted or lost contacts, photos, videos, audios, SMS, call logs, WhatsApp chat, Viber messages from any Android devices due to accidental deletion, virus attack, formatting. It supports all popular Android smartphones and tablets like Samsung, HTC, LG, Huawei, Motorola, Nexus, etc.
An all-in-one WhatsApp Manager which can be used as a complete solution to backup, restore, recover and transfer WhatsApp chat history, contacts, call logs, pictures, videos, audio messages and all other WhatsApp attachments on Android & iPhone.
- Get link
- X
- Other Apps
Comments
Post a Comment