Learn how to edit photos and video easily with Jihosoft Photo Eraser. Eraser Tool For Photos
How To Take Advantage Of The Photo-Editing Tools In iOS 13 And iPadOS 13
Get link
Facebook
X
Pinterest
Email
Other Apps
-
The Photos app for macOS has improved substantially since its introduction, especially in the variety and sophistication of its image editing tools. On the iPhone and iPad, Photos lagged considerably. But with iOS 13 and iPadOS 13, Apple offers a distinct catch up with its image editing tools, even exceeding the Mac version in a couple regards.
Let’s look at what’s new and how to best use these new tools to crop, revise, and enhance images after capturing pictures.
What’s new in Photos editing
Apple changed and expanded the controls available while editing, while also improve the way in which each control is accessed and modified.
Intensity slider. Nearly every tool now has an adjustment slider you can slide left and right or up and down, depending on your editing orientation. This allows fine and coarse changes in the “intensity,” or how much of the setting you’re applying. Tapping the main control icon typically resets the slide back to remove the adjustment. Haptic feedback lets you feel a sort of rotation, like it’s a dial, particularly the zero point. Intensity also applies to photo filters, so you can apply one with heavy or light hand, as you like.
Cropping. You can now skew an image in each axis across its middle and its center as separate controls, the effect of rotating the image as it were a flat object you were turning with perspective towards or away from you.
Controls don’t crowd the screen. Earlier editing tools splayed out more like the macOS equivalent, making it very awkward to see and select tools from a list on an iPhone. The new layout works far better in any view.
More editing adjustments. If you’ve used the adjustment options in Photos for macOS, none of the tools in Photos for iOS and iPadOS will be new, but several make their first appearance here. Those are Definition, Noise Reduction, Sharpness, Tint, Vibrance, Vignette, and Warmth.
Zoom for details. You can use gestures to zoom and pan within an image while you’re adjusting it to see the effects of your changes close up. You can zoom to fill the entire screen, as shown.
Use the new editing tools
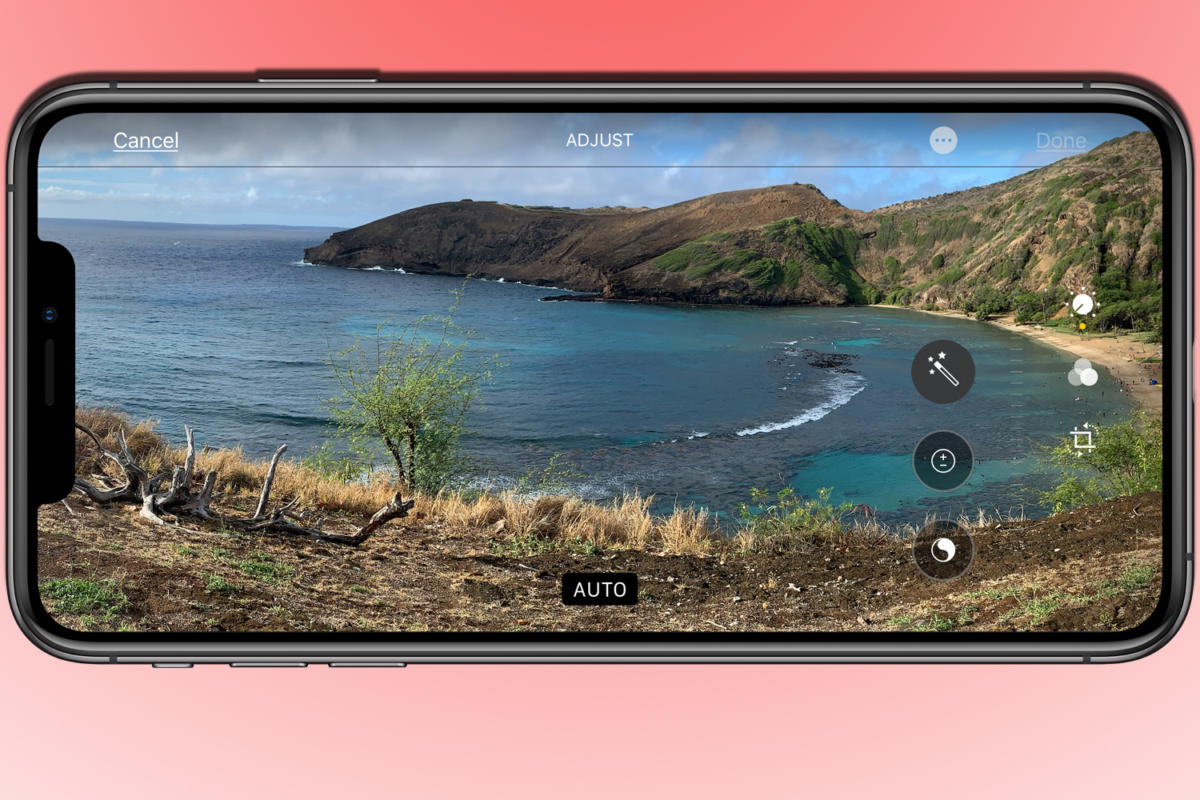
Tap the dial icon, and the general editing tools appears, which you swipe through. An all-caps label appears below the image, identifying which of the 16 tools is selected. The intensity slider appears below the tool when your iPhone or iPad is in portrait orientation and to its right in landscape.
IDG
The editing controls are easier to access and reveal changes made to each.
You’re familiar with the Auto tool, which is like the legendary “make better” button. Tap it, and Photos analyzes the image and applies a number of corrections to make it pop. In this update, however, you can use the intensity slider to increase or reduce the overall enhancement.
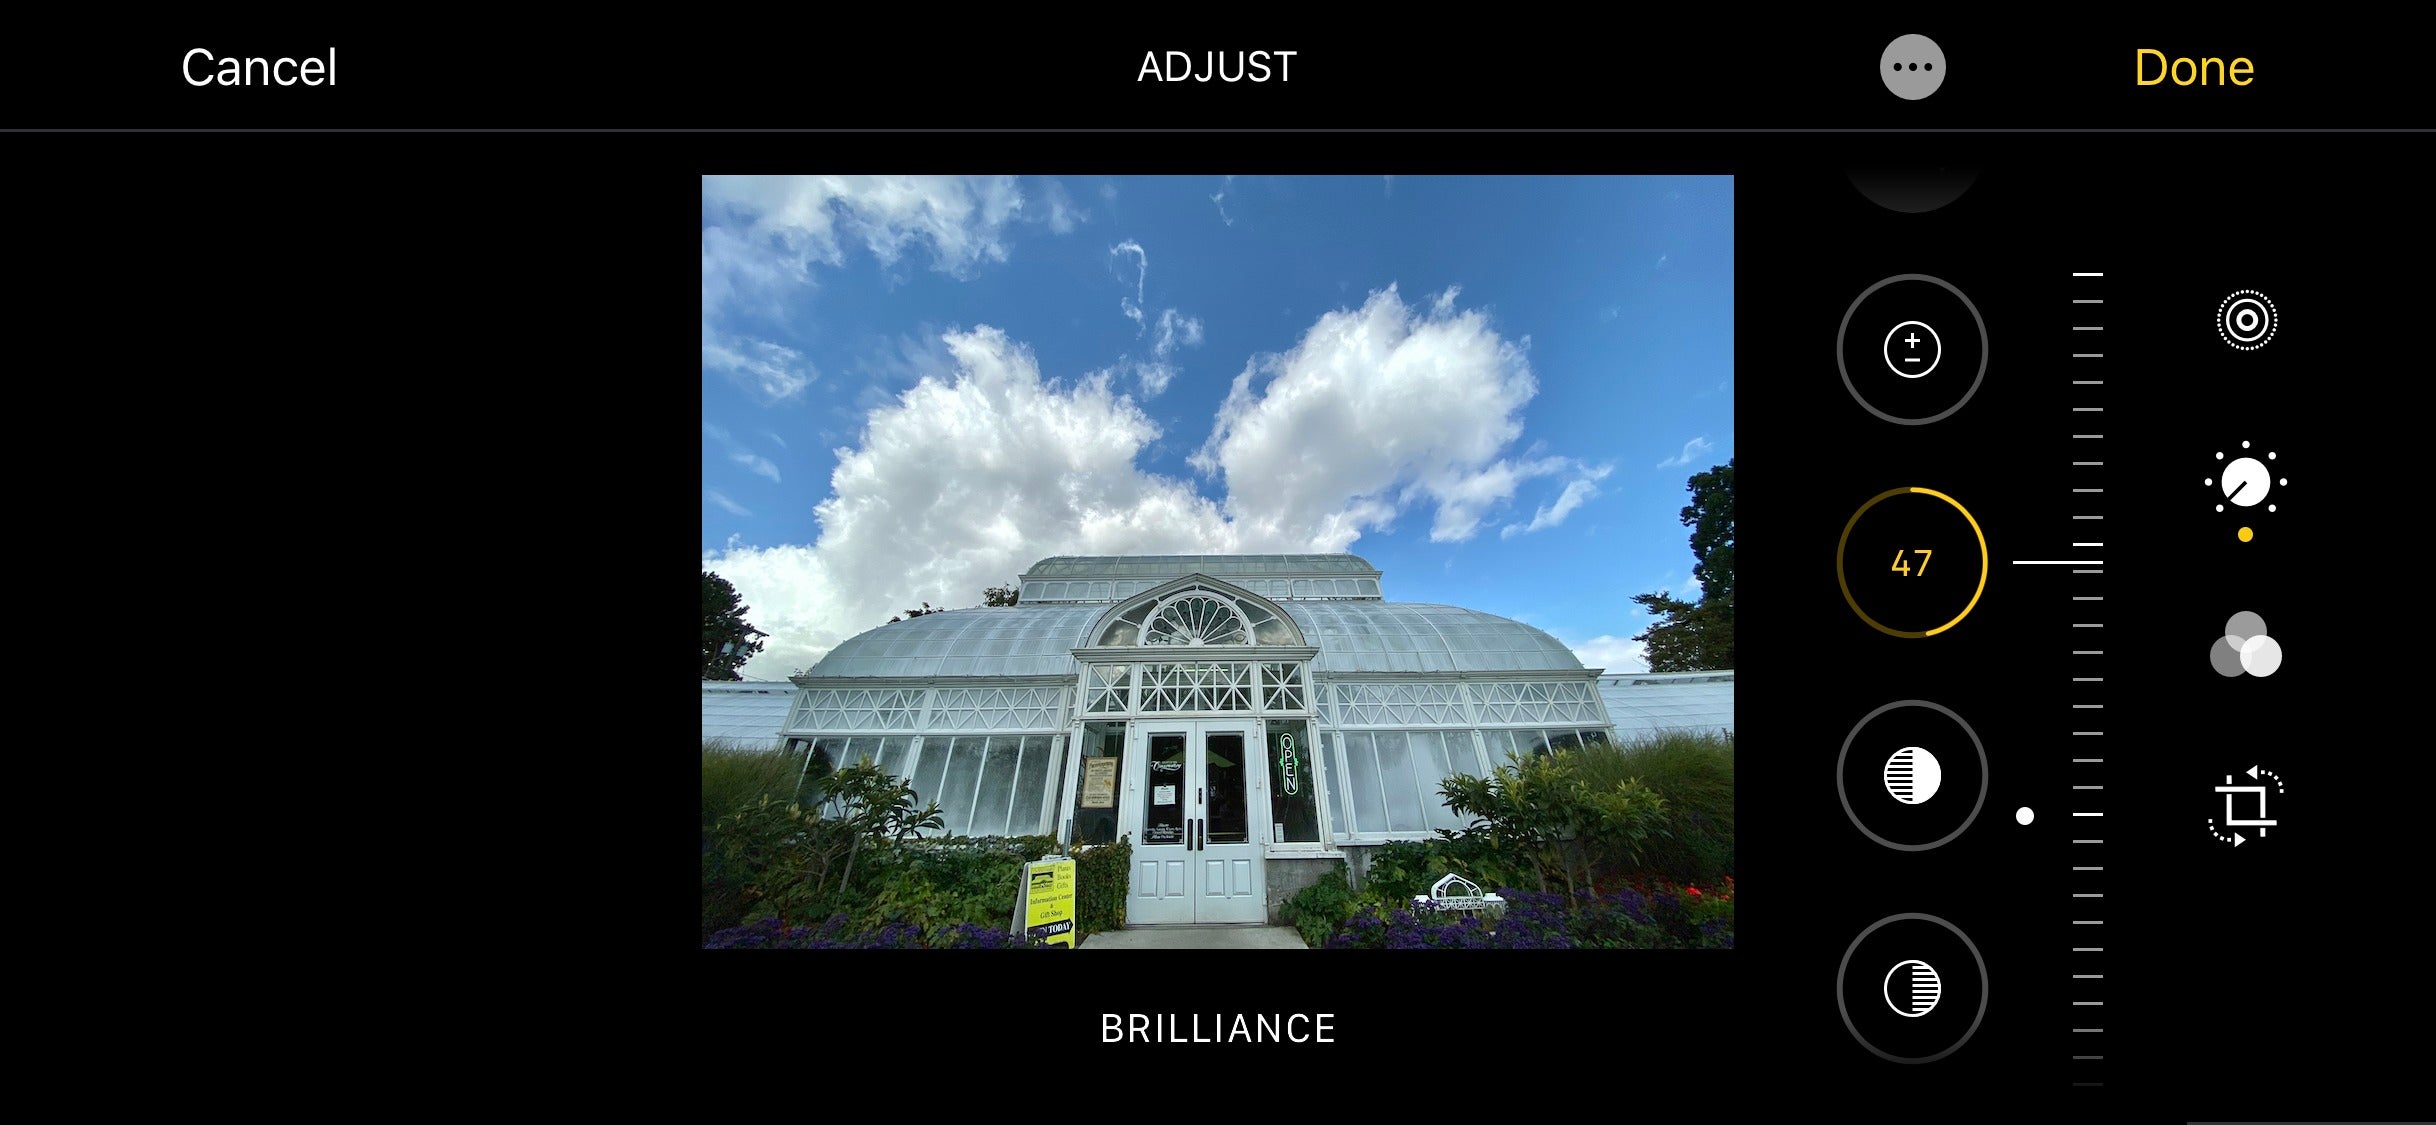
You’ll also notice that each editing control shows the amount of adjustment applied as a filled portion of the outline of the circle surrounding its icon. Positive values—increasing the setting—show as yellow in the circle, while negative values show as a white line in the perimeter. This all lets you take in adjustments at a glance when you want to modify them individually. Tap the control, and Photos toggles it to 0 or a neutral settings, depending on the tool; tap again, and the previous value is restored.
You can also view the image with and without current corrections. Tap the image and corrections disappear. Photos displays a label that says Cropped Original if the entire image isn’t shown. You can tap to get back to the current modifications or, after a few seconds, the display toggles back to that, too.
Instead of using Auto, you can swipe and pick specific controls to adjust from scratch. For example, increasing contrast puts more tonal difference between midtones, which can make an image look starker—often bad for photos of people, but good for those of objects. You might also try Definition, which combines sharpening and contrast in a photo’s midtones, enhancing detail more subtly.
Noise Reduction is a big help for photos taken in low-light conditions, which can produce speckling or other kinds of artifacts across smoother areas of tone. Don’t pump it up too much, or your images start to look ultra smooth and artificial. Balancing Sharpness and Noise Reduction can often dramatically improve a picture’s clarity.
Exposure, Brilliance, Highlights, Shadows, Contrast, Brightness, and Black Point all adjust different aspects of an image’s overall tonal range. Exposure bumps all tones up, and can blow out (eliminate detail) from the lightest areas. Brightness and Brilliance carve out aspect of tones to change, and can bring out detail from a dark photo or enhance the brightest parts—but so can Shadows and Highlights, which affect only the darkest and brightest tones. It’s worth experimenting to find the right balance, and this new editing environment makes it very easy to play with values.
While Photos now includes Vibrance, Tint, and Warmth—Saturation was already present—it can be difficult to get the right tone on your images when you’re trying to adjust for natural or artificial lighting. Photos in macOS still offers more robust adjustment tools, especially in its White Balance section.
One missing piece are the black and white controls, still available in macOS, which let you switch a picture from color to grayscale. However, you can use the Mono, Silvertone, and Noir filters to apply a conversion, and then use the editing controls to tweak the tonal shape.
Crop and straighten in multiple dimensions
You might think it peculiar that I am jumping up and down—and side to side—about cropping, but the update in cropping controls and automatic correction dramatically improves how you can correct a shot or make artistic modifications within the Photos app.
Previously, you just had cropping edges and corners, a rotation dial, and the proportions button (still present, but improved) to choose cropping ratios. Now, there are three adjustment tools. It helps to visualize an image in this mode as being a real photo you hold in your hands that you can move around. The tools are:
Standard rotation (icon at left) is the familiar rotation around the axis as if the photo is held flat in front of you and you turn it from a car’s steering wheel.
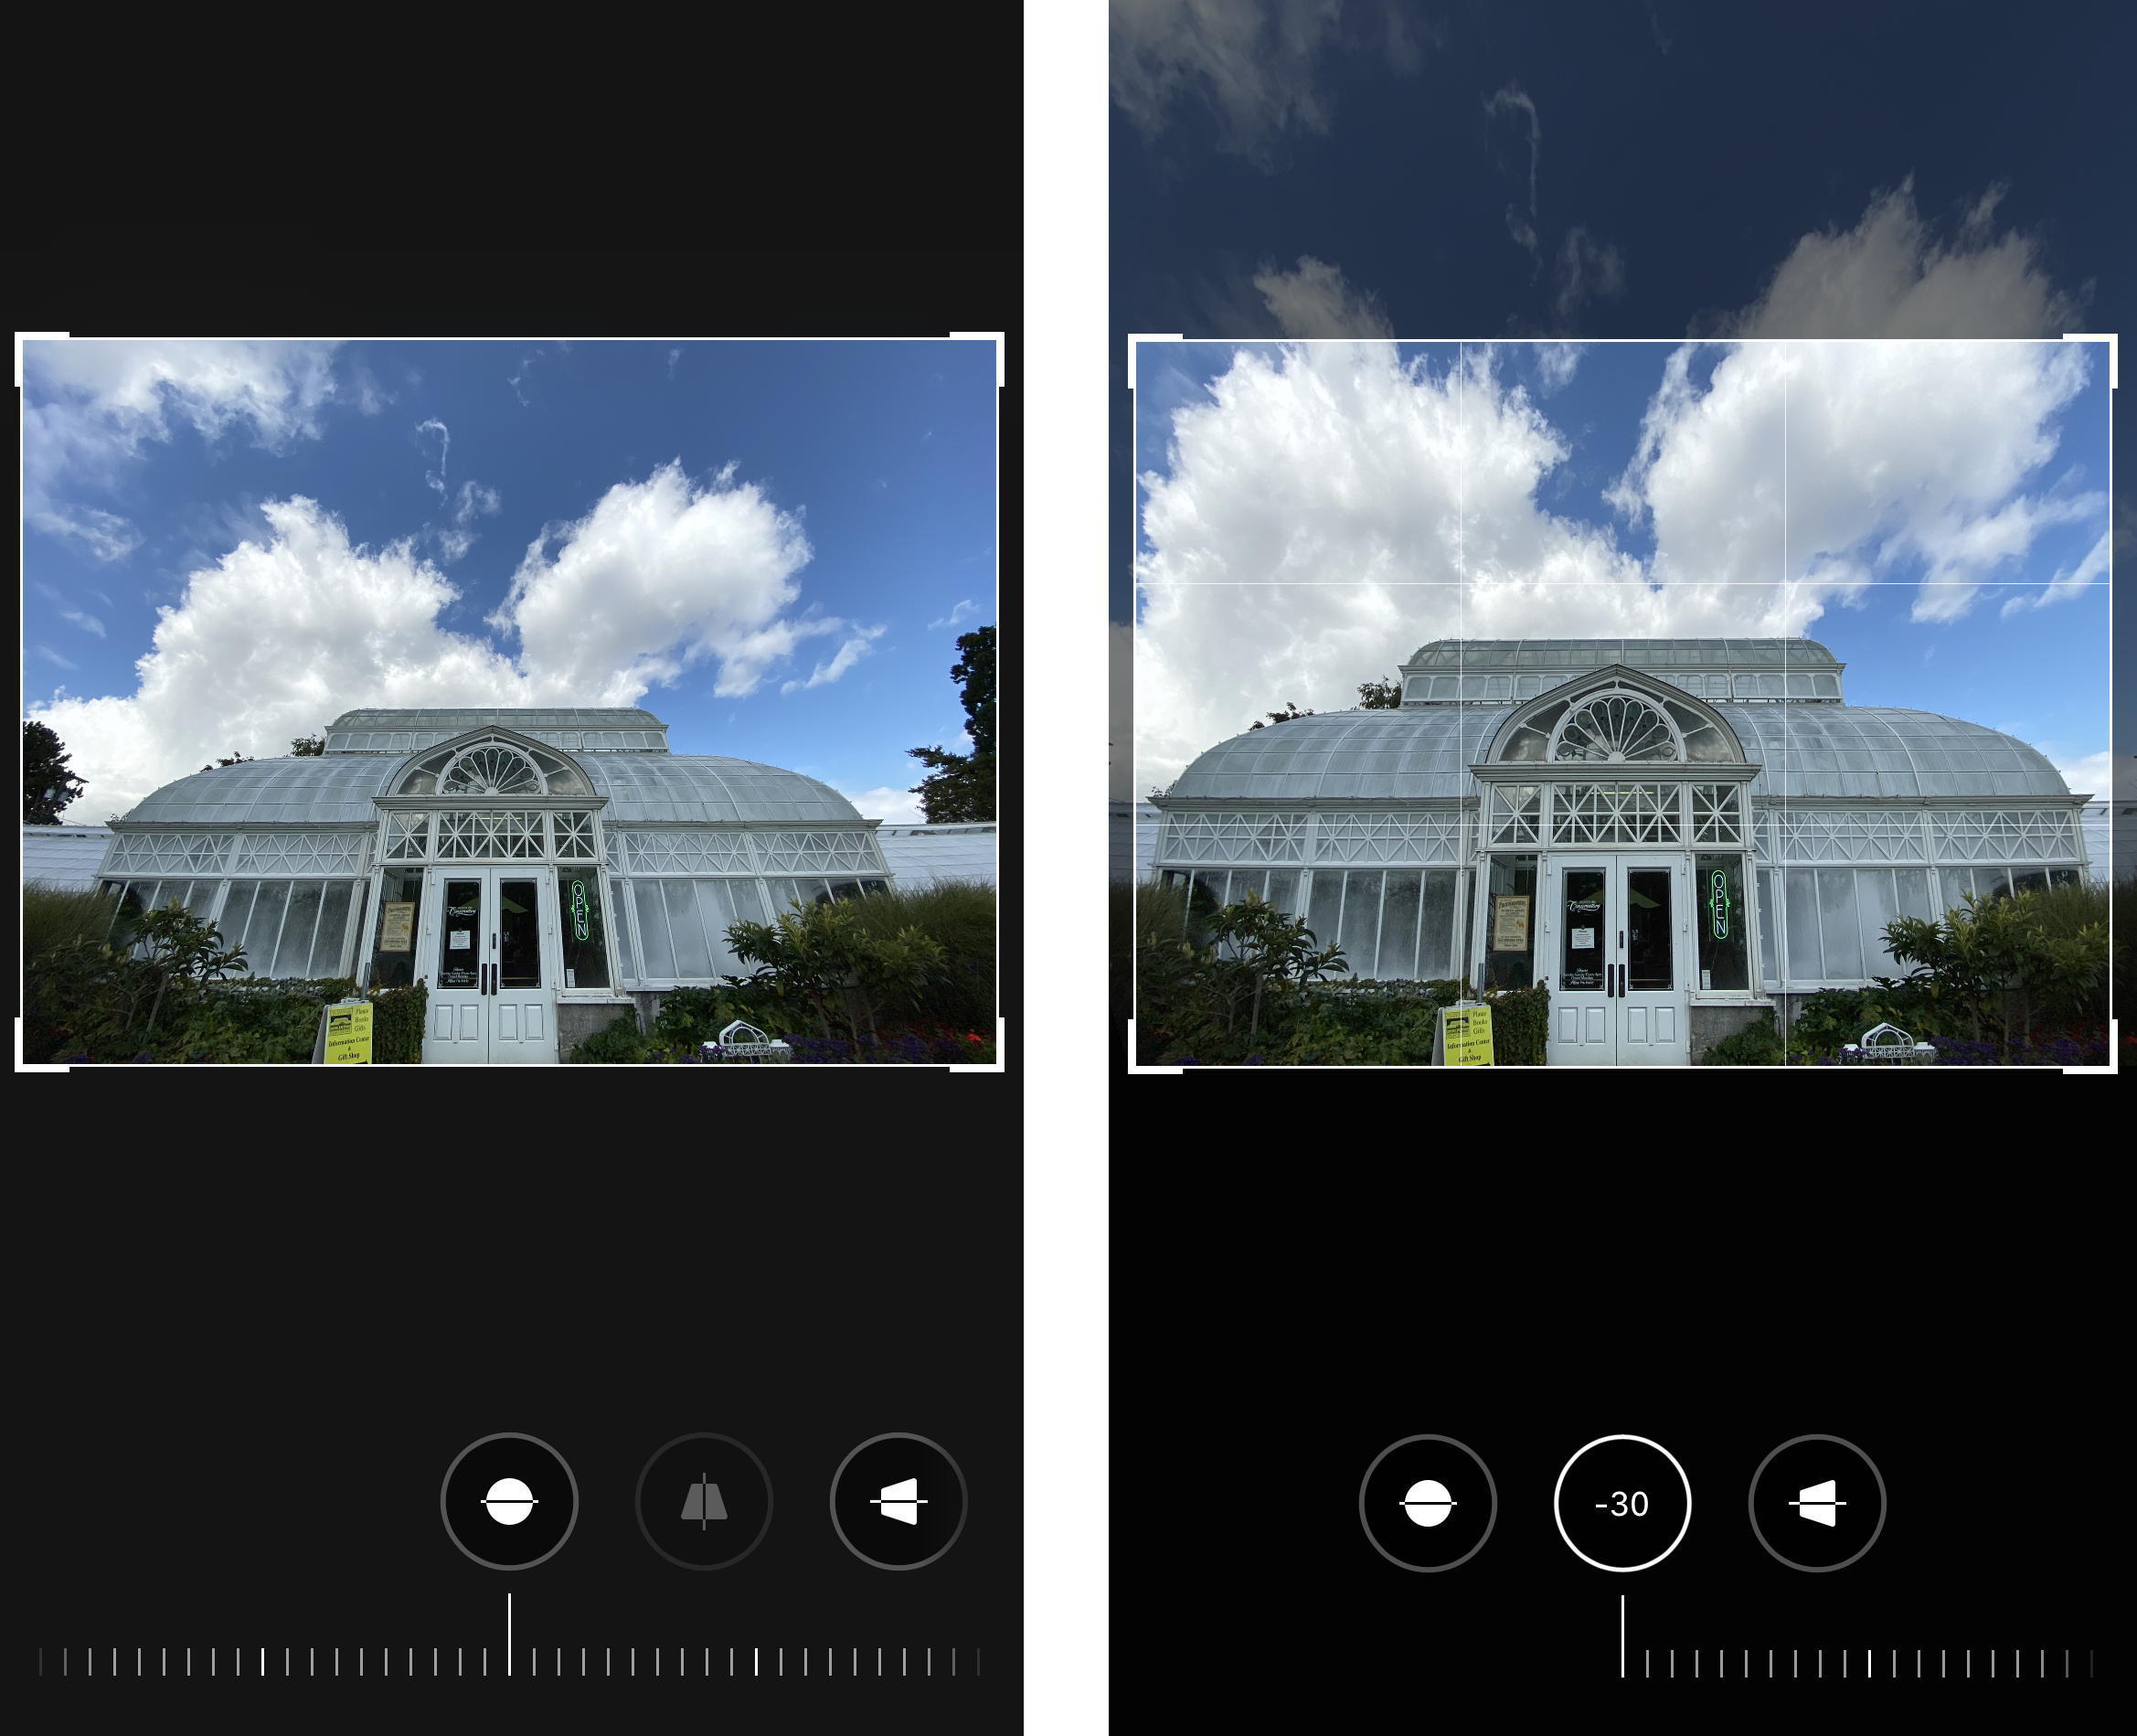
Tilt forward/backwards (middle icon) treats the photo as if you’re tilting it towards you at the top with the bottom nearly anchored, with the perspective warping as you do (negative slider), or towards you from the bottom with the top mostly anchored (positive slider).
Tilt left/right (icon at right) tilts the image with perspective towards you from the left with the right loosely anchored (negative slider) or towards you from the right with the left more firmly in place (positive slider).
This combination can let you correct for optical effects, particularly in adjusting images taken with the new ultra-wide-angle lens on the iPhone 11 series.
IDG
The new tilt options for the Crop tool let you fix perspective on images, such as this wide-angle shot (left) normalized for perspective with top/bottom tilt (right).
Tapping the Crop tool before making any changes triggers an analysis by Photos. Previously, this applied just straightening. Now it may also automatically apply a tilt, too. If corrections were made, an white-on-yellow AUTO button at the top appears with a dash-bordered square to its left. You can tap that button to toggle those changes off and on.
Finally, if you have an iPhone 11 model phone, you can turn on Capture Outside the Frame in Settings > Camera, and if you’re shooting at 1x (all iPhone 11 models) or 2x (iPhone 11 Pro and Pro Max), the Camera app captures additional detail used for automatic framing, but that’s available for adjustment in the Crop view.
The Camera app may automatically apply cropping adjustments using information outside the frame if Settings > Camera > Auto Apply Adjustments is on. If so, you see a blue AUTO label in Photos. (I have no yet seen this appear after taking a large number of over-captured photos, however.)
Erase unwanted objects and perfect your amazing photos!
Remove objects from photos with Photo Eraser is almost as easy as taking a shot. Now you can use this tool to erase undesirable objects from your pictures, such as tourists, watermarks, logos, texts, blemishes and other unwanted things without real photo-editing skills required at all.
An all-in-one WhatsApp Manager which can be used as a complete solution to backup, restore, recover and transfer WhatsApp chat history, contacts, call logs, pictures, videos, audio messages and all other WhatsApp attachments on Android & iPhone.
A picture is modifiable in several ways. You can add text to it, crop it into shapes , add effects and filters, give emotions to it by adding emojis on it. Sometimes, after adding emojis on a photo, we want to view the original picture without the smiley. If you are still editing the photo, you can undo the changes, but if you have saved the copy and you don’t have the original file, how do you remove the smiley from your image ? In this post, we will tell you how to remove smiley from your images. The same concept can be used to remove text and other objects without Photoshop. However, it’s important to know that removing the smiley will not replace it with the original background. It will be swapped with the surrounding background that will make it look like an unedited photo. NOTE: Sometimes, we use emojis to hide faces. Removing emojis will not show you the face behind the emoji. Let’s check out the three ways to remove emojis online from your pictures...
Picsart photo studio is one of the best image editing apps for Android devices on the Play Store. With this next level editor comes many tools which allow you to bring your images to life by editing them creativity. On an image, you can start by applying filters from the tools menu, make a collage with different pictures, click images with its in-built camera apply stickers and much more. Here are some of the best tips to become a pro editor in Picsart. Best tips for PicsArt Android Pie Here are some tips for the PicsArt that will help you get the best out of the beautiful and feature-rich imae editor app. In case we missed a feature think deserves to be here, do give us a shout. Add text to your photos Text on an image can be very appealing and also provides a suitable feel to the image. PicsArt allows you to add text to your images very easily, It has a variety of Fonts to choose from and therefore applying effects to the text which gives it a 3D feel...
1 ) VTech Kidizoom DUO Camera -Most Popular By VTech MORE PICTURES BUY FROM AMAZON ADD TO AMAZON CART Cute, durable and ready for actions describe v-tech’s Kidizoom DUO Camera. Ideal for children you can find a bevy of features, including two lenses at back and the front with a dedicated switching button. Two lenses may seem a little broad, however this creates a camera that is good for both selfies and photography that is normal. The 2.4-inch TFT display pairs with the 1600 x ray 1200-pixel front camera along with 640 x 840 rear lens. VTech adds a built-in micro sd card back with power, although there is only 256MB of integral memory. v-tech delivers an automated to preserve battery lifetime. Battery lifetime kids will love the voice recording feature that offers five different voice-changing outcomes, in addition to prevent frame animation. Weighing just 1.2 pounds, the v-tech is supported with a wrist strap for additional protection against dr...


Comments
Post a Comment